
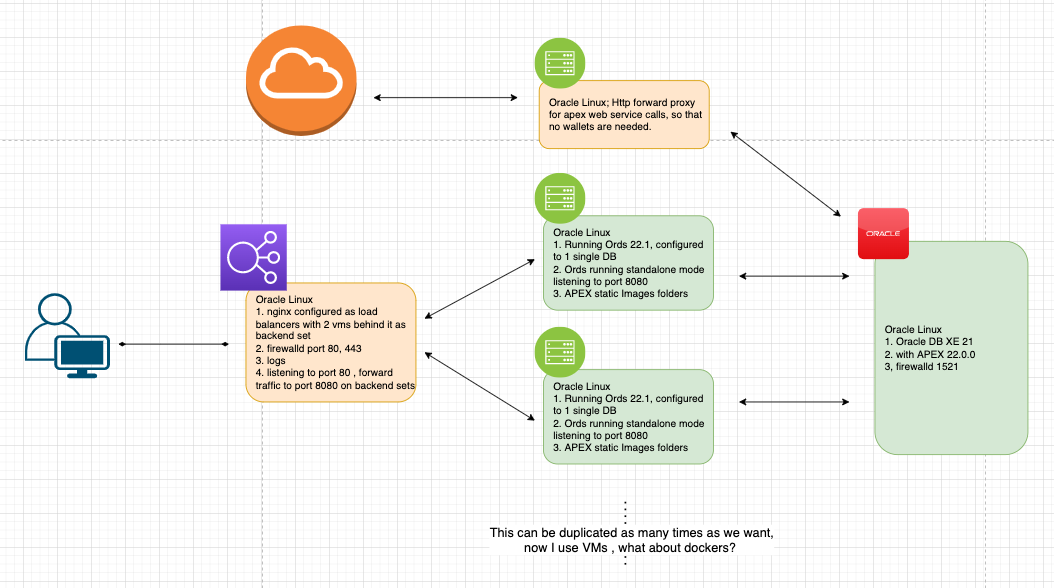
- High level design
- Database & APEX installation
- Linux ORDs Installation
- Nginx load balancer configuration
- Nginx PLSQL Webservice Proxy server configuration
High level design
Database & APEX installation
- Oracle 21XE installation
- Oracle APEX installation
Database Installation
For Oracle 21XE installation, i would suggest to follow this oracle official guide, it is pretty straight forward. (I assume that you use Oracle Linux 8.5 as your host operating system)
Common Issues with DB installation
If you ever face the issue that during post installation, sqlplus command cannot be found. Here is your possible fix.
nano ~/.bash_profileadd these lines to the end
export PATH=/usr/local/sbin:/usr/local/bin:/usr/sbin:/usr/bin:/root/bin:/opt/oracle/product/21c/dbhomeXE/bin
export ORACLE_HOME=/opt/oracle/product/21c/dbhomeXE
export ORACLE_SID=XE
Notice that I am running db version 21c here, you need to change it to your db version accordingly.
Next, if you on ssh, exit current session and reconnect, sqlplus should now work
Next, we need to open port 1521 for remote connections.
firewall-cmd --list-all #check opened ports
firewall-cmd --add-port=1521/tcp --permanent.   # add 1521
firewall-cmd --reload.  # reload firewall
Oracle APEX installation
I have a mixed bag of feelings about APEX installations, there are lot of guide of how to do this, and all of them does it slightly different from each other. I will leave some links, you decide which one to follow.
It all involves
| Download APEX.zip |
| Unzip file into a folder |
| CD into that folder |
| Connect to DB with sqlplus, switch to Pluggable database (normally XEPDB1) |
| run sql scripts from that folder |
Note that we don’t need to do anything with the APEX IMAGES folder, since we use ORDS on dedicated machines, we need to do it a little differently, therefore, we need the IMAGES folder when we config ORDs servers.
Linux ORDs Installation
For ORDs, we use dedicated linux server for it.
(I assume you are using Oracle Linux 8.5 as your host operating system) Installation ORDs on linux is very easy, for that we need to download the latest version of ORDs. Google Oracle ORDs and find the download link then use wget to download it directly onto your server.
create a new folder
mkdir -p /opt/oracle/ords
# unzip into
unzip ords-*.zip -d /opt/oracle/ords
# install ORDs
java -jar ords.war install
ords install
#both should work
Before you can use ords as command, remember to add /opt/oracle/ords/bin to your bash profile.
cat ~/.bash_profile
nano ~/.bash_profile
During ORDs installation, we are prompted to answer some questions related your existing DB we installed earlier, these information are used to for ORDs to establish connection to it. these questions are
| Private IP of the DB |
| port of the DB ( normally 1521 ) |
| sys user /sys pwd (this pwd were set during installation) |
| pluggable SID name ( normally XEPDB1 ) |
| set static location for APEX images (/var/www/apex/images) |
| port for ords to listen (8080) |
APEX static files ‘IMAGES’ folder
Use wget to download apex.zip onto this server and unzip it to a folder. Copy all content within images into /var/www/apex/images
mkdir -p /var/www/apex/images
cp -a /opt/oracle/apex/images/. /var/www/apex/images
And don’t forget to open port 8080
firewall-cmd --list-all #check opened ports
firewall-cmd --add-port=8080/tcp --permanent.   # add 1521
firewall-cmd --reload.  # reload firewall
Create systemd service to auto start ORDs on Linux system startup
nano /etc/systemd/system/ordsonboot.serviceEnter the following content:
[Unit]
 Description=Service description
[Service]
 User=root
 ExecStart=/bin/bash -c 'PATH=/opt/oracle/ords/bin:$PATH exec /root/start_up_script.sh'
[Install]
 WantedBy=default.target
create start_up_script.sh
nano start_up_script.shenter the following content:
cd /root && ords serve
#cd to root and execute "ords serve" see more from ords installation guide from oracle
add execute permission
chmod +x start_up_script.shExplanation :
You can also run cd /opt/oracle/ords/ && ords serve instead. In any folder when you run “ords serve”, two folders will be created, they are databases and global. Within them, you can find some xml files with settings. They can be changed according to you needs.
prepare service and enable it and run it
systemctl daemon-reload
systemctl start ordsonboot.service
systemctl status ordsonboot.service #check status
systemctl enable ordsonboot.service #to enable startup run
systemctl stop ordsonboot.service #to stop service
This is the last step for ORDs installations, we now can clone this VM and spin it into a new vm. In fact, you can clone this VM as many time as you would like and add it into your load balancer backends.
Nginx load balancer configuration
- DNS records
- SSL wild cards
- Nginx Load Balancer
- Nginx SSL
- Nginx force WWW
For this load balancer configuration, I will use my own domain and add a wildcard ssl.
DNS Records settings
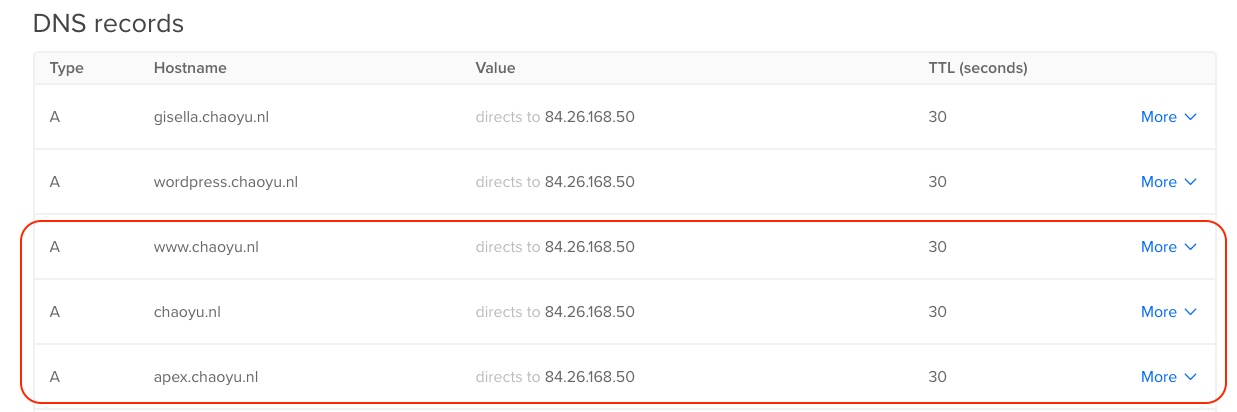
I use Digital Ocean as my DNS management tool. One of the reasons that I choose Digital Ocean is that it can easily create wildcards SSL for you domain and subdomains.
In the DNS records, I created 3 A records, they all point to my IP address.I use apex.chaoyu.nl as the url to my loadbalancer.
Request wildcard SSL
Here is a wonderful link I have used to create the ssl for my domain. Notice that the domain section I typed -d '*.chaoyu.nl' -d 'chaoyu.nl' , this way both chaoyu.nl and apex.chaoyu.nl will be SSL enabled.
sudo certbot certonly \
  --dns-digitalocean \
  --dns-digitalocean-credentials ~/certbot-creds.ini \
  -d '*.chaoyu.nl' -d 'chaoyu.nl'
After you have followed the link, you should see some files in
cd /etc/letsencrypt/live/chaoyu.nl/ 
Renew SSL Certificates
To renew your SSL certificates , simply run the following commands.
certbot renewThis is the output from “cerbot renew”, you would need to restart your webserver or reboot your server to see effects.
Saving debug log to /var/log/letsencrypt/letsencrypt.log

- - - - - - - - - - - - - - - - - - - - - - - - - - - - - - - - - - - - - - - -
Processing /etc/letsencrypt/renewal/chaoyu.nl.conf
- - - - - - - - - - - - - - - - - - - - - - - - - - - - - - - - - - - - - - - -
Renewing an existing certificate for *.chaoyu.nl and chaoyu.nl
Waiting 10 seconds for DNS changes to propagate

- - - - - - - - - - - - - - - - - - - - - - - - - - - - - - - - - - - - - - - -
Congratulations, all renewals succeeded:
  /etc/letsencrypt/live/chaoyu.nl/fullchain.pem (success)
- - - - - - - - - - - - - - - - - - - - - - - - - - - - - - - - - - - - - - - -
Nginx Load Balancer Configurations & SSL & Force WWW
All these 3 topics are packed in one configuration file as following
user root; # it can be user Nginx
worker_processes auto;
error_log /var/log/nginx/error.log; # here is your error log file location, you can also have access log as well. we will discuss it in the forward proxy config file
events {
worker_connections 1024;
}
http {
upstream backend {
server 192.168.178.46:8080;
server 192.168.178.45:8080;
server 192.168.178.50:8080;
} # this is my backend set, 3 ORDS servers, they are running in standalone mode.
#www.chaoyu.nl
server {
listen 80;
server_name chaoyu.nl www.chaoyu.nl;
return 301 https://www.chaoyu.nl$request_uri;
} # redirect 80 traffic to 443 and force WWW
server {
listen 443 ssl;
server_name chaoyu.nl;
ssl_certificate "/etc/letsencrypt/live/chaoyu.nl/fullchain.pem"; # pointing at your file
ssl_certificate_key "/etc/letsencrypt/live/chaoyu.nl/privkey.pem"; # pointing at your file
return 301 https://www.chaoyu.nl$request_uri;
} # redirect none WWW traffic to 443 and force WWW
server {
listen 443 ssl;
server_name www.chaoyu.nl;
root /usr/share/nginx/html2;
ssl_certificate "/etc/letsencrypt/live/chaoyu.nl/fullchain.pem";
ssl_certificate_key "/etc/letsencrypt/live/chaoyu.nl/privkey.pem";
ssl_session_cache shared:SSL:1m;
ssl_session_timeout 10m;
ssl_ciphers PROFILE=SYSTEM;
ssl_prefer_server_ciphers on;
location / {
index index.html index.htm;
}
}# redirect 443 traffic handler
# apex.chaoyu.nl
server {
listen 80;
server_name apex.chaoyu.nl;
return 301 https://$server_name$request_uri;
}# redirect 80 traffic to 443
# Settings for a TLS enabled server.
server {
listen 443 ssl;
server_name apex.chaoyu.nl;
# root /usr/share/nginx/html;
ssl_certificate "/etc/letsencrypt/live/chaoyu.nl/fullchain.pem";
ssl_certificate_key "/etc/letsencrypt/live/chaoyu.nl/privkey.pem";
ssl_session_cache shared:SSL:1m;
ssl_session_timeout 10m;
ssl_ciphers PROFILE=SYSTEM;
ssl_prefer_server_ciphers on;
# Load configuration files for the default server block.
# include /etc/nginx/default.d/*.conf;
location / {
proxy_pass http://backend; # load balancer
proxy_set_header Origin "" ; # needed for apex
proxy_set_header X-Forwarded-Host $host:$server_port; # needed for apex
proxy_set_header X-Real-IP $remote_addr; # needed for apex
proxy_set_header X-Forwarded-For $proxy_add_x_forwarded_for; # needed for apex
proxy_set_header X-Forwarded-Proto $scheme; # needed for apex
}
}# SSL for apex.chaoyu.nl subdomain
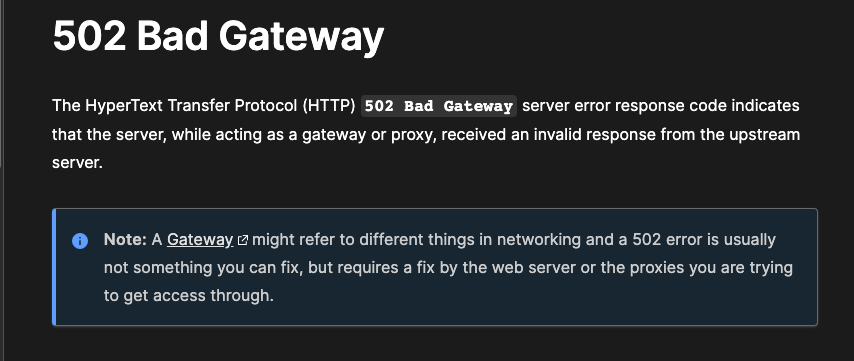
}Load Balancer Common Issues
You can read more here,
Basically, you need to run this command. ( Don’t ask me why )
sudo setsebool -P httpd_can_network_connect 1PLSQL Rest Call with Proxy, no wallet needed
Create a Nginx Forward Proxy
install vm, install nginx
cd /etc/nginx
mv nginx.conf nginx.conf.old # to save default file in case you need.
nano nginx.conf
and here is my configuration file
user nginx;
worker_processes auto;
error_log /var/log/nginx/error.log;
events {
    worker_connections 1024;
}
http {
    log_format compression '$remote_addr - $remote_user [$time_local] '
                           '"$host" $host '
                           '"$request" $status $body_bytes_sent '
                           '"$http_referer" "$http_user_agent" "$gzip_ratio"';
  server {
      listen 80;
      access_log /var/log/nginx/nginx-access.log compression;
      # i promised access_log and  here is how
      resolver 8.8.8.8;
      location /api.linkedin.com/v2/me {
         set $passUrl https://api.linkedin.com/v2/me;
         proxy_pass $passUrl;
      }
      location /onesignal.com/api/v1/notifications {
         set $passUrl https://onesignal.com/api/v1/notifications;
         proxy_pass $passUrl;
      }
    # each time i need to a new access point, i come here to add a new location node, can it be better , ja if will be nice if this can be dynamic , where it takes location automatically .
  }
}
Remember to open port 80 using firewall-cmd.
Login to Oracle DB server and edit Host file on the server
Host file is the local DNS resolver, here we create a new host record. it can be something like this .
cat /etc/hosts127.0.0.1 localhost localhost.localdomain localhost4 localhost4.localdomain4
::1 localhost localhost.localdomain localhost6 localhost6.localdomain6
192.168.178.51 proxy.local. # add this line. ( your ip should be different )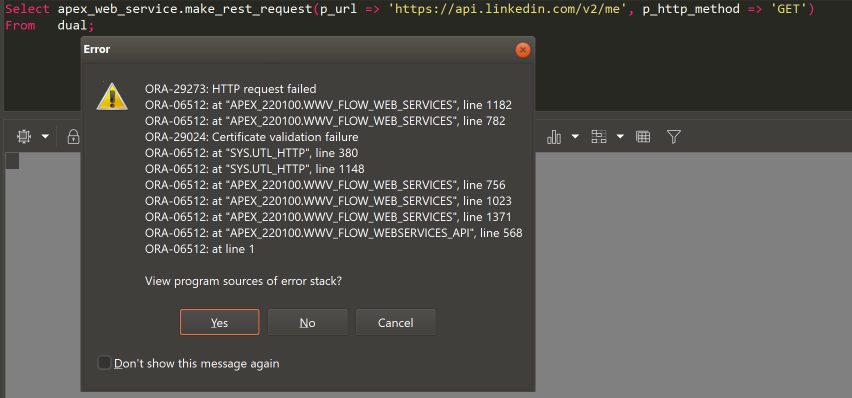
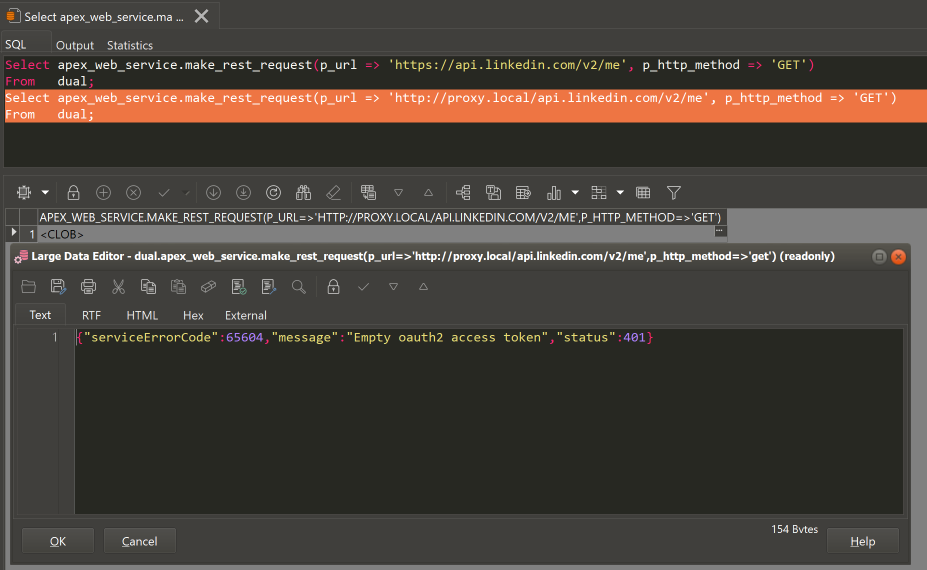
Done.